Manage Entity - Entity Overview
Use the functionality to view the complete 360 view of a customer or entity and manage the details. The feature is applicable to all bank users who are assigned the required permissions to manage entities.
On the dashboard, from the list of requests, click any link under Borrower. Alternatively, from the list of tasks or on the facility overview screen, click any borrower/entity name to manage the entity details.

The application displays the entity overview screen with the following details:
Left pane menu
The menu items on the left pane and the corresponding details on the right pane. Click any menu item on the left pane to view the corresponding details on the right pane.
Task sticky footer
The task sticky footer is displayed on the bottom of the screen. Applicable only if navigated to this screen from the tasks list screen.
General
The application displays the following menu items under the General menu on the left pane. By default, the entity overview details are displayed on the right pane.
Entity Overview
The application displays the entity related information. Click to view the information based on the entity type - Individual, Business, or Group.
Individual Entity Details
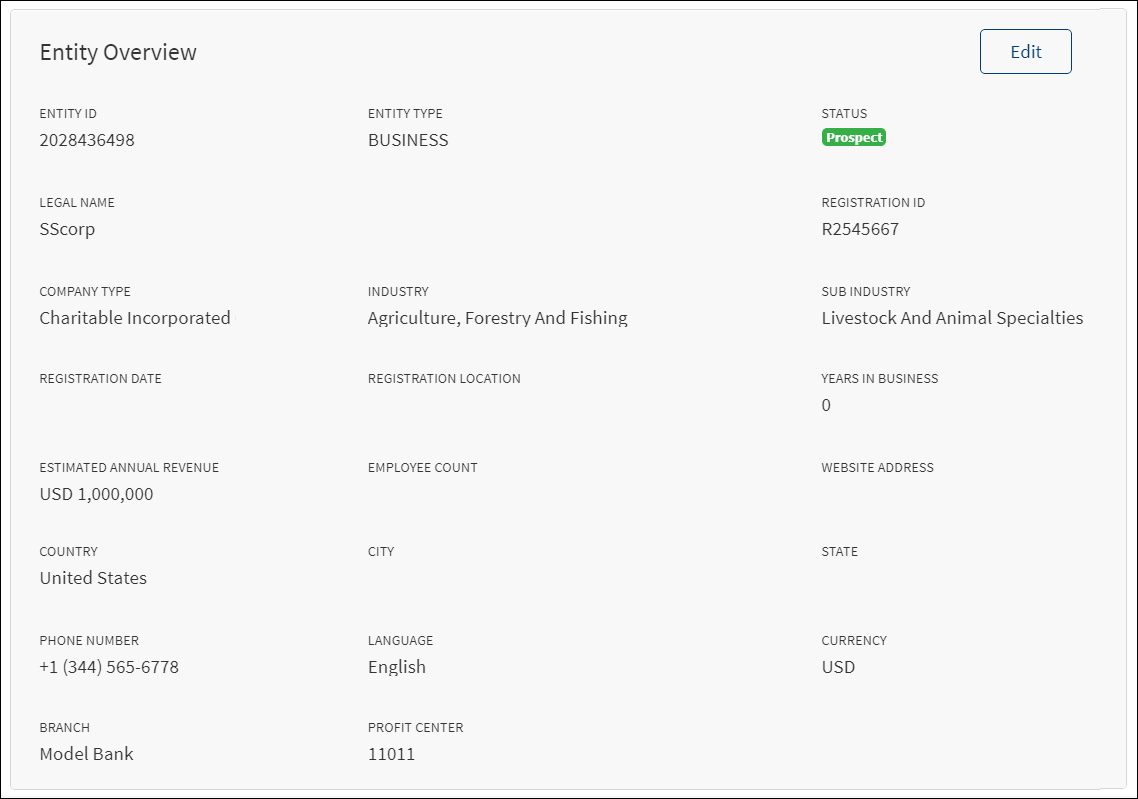
The application displays the following information:
- General Information: Entity ID, Entity Type (Individual), Status, First Name, Middle Name, and Last Name of the applicant, Full Registration Name of applicant, Gender, National ID Number which is the SSN, Date of Birth, ID Type, ID Number, Expiry Date, Email, Phone Number, Country of Issue, State of Issue , Issue Date, Expiry Date, Email, Phone, MIS Code, Sector, Risk Sector, Language,Currency ,Branch and Profit Center. Few information are picked from the back-end system, for instance, the bank branch and profit center are mapped with the relationship manager of the entity.
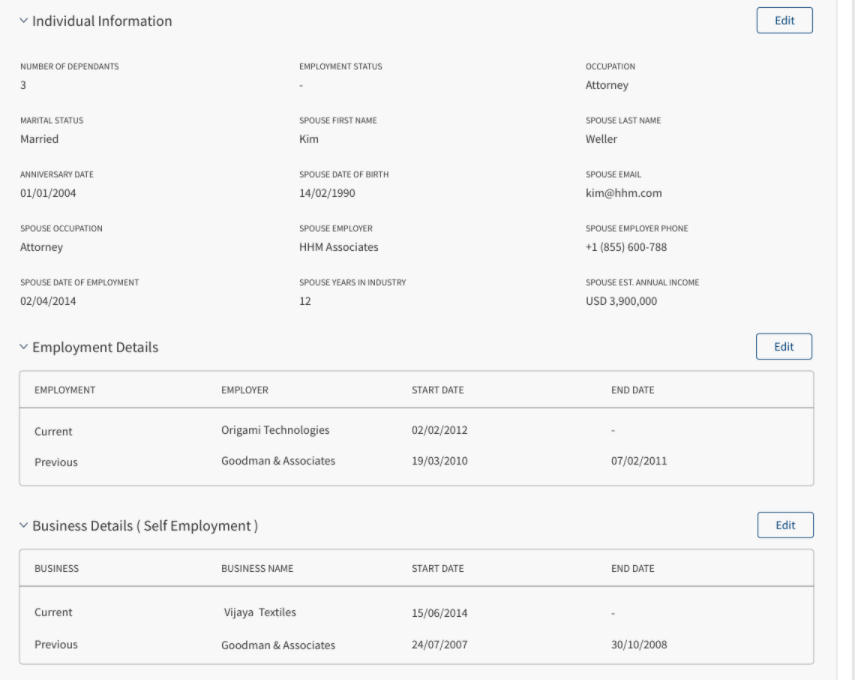
- Individual Information: This section is an accordion, in the collapsed state by default and expands only when the user wants to view the individual information.
- Number of Dependents, Employment Status, Occupation, Marital Status, Spouse First Name, Spouse Last Name, Anniversary Date, Spouse Date of Birth, Spouse Email, Spouse Occupation, Spouse Employer, Spouse Employer Phone, Spouse Date of Employment, Spouse years in Industry, Spouse Annual Income. Position, Employer, Employer's Business, Employer Country, Employer Address, Employer State, Employer City, Employer Zip/Postal Code, Employer Phone, Date of Employment, Years in Industry (if the status is married, then spouse related fields such as anniversary date, spouse first and last name, and spouse date of birth are displayed. If marital status is not received from core banking and not provided by the individual, the spouse related fields does not appear).
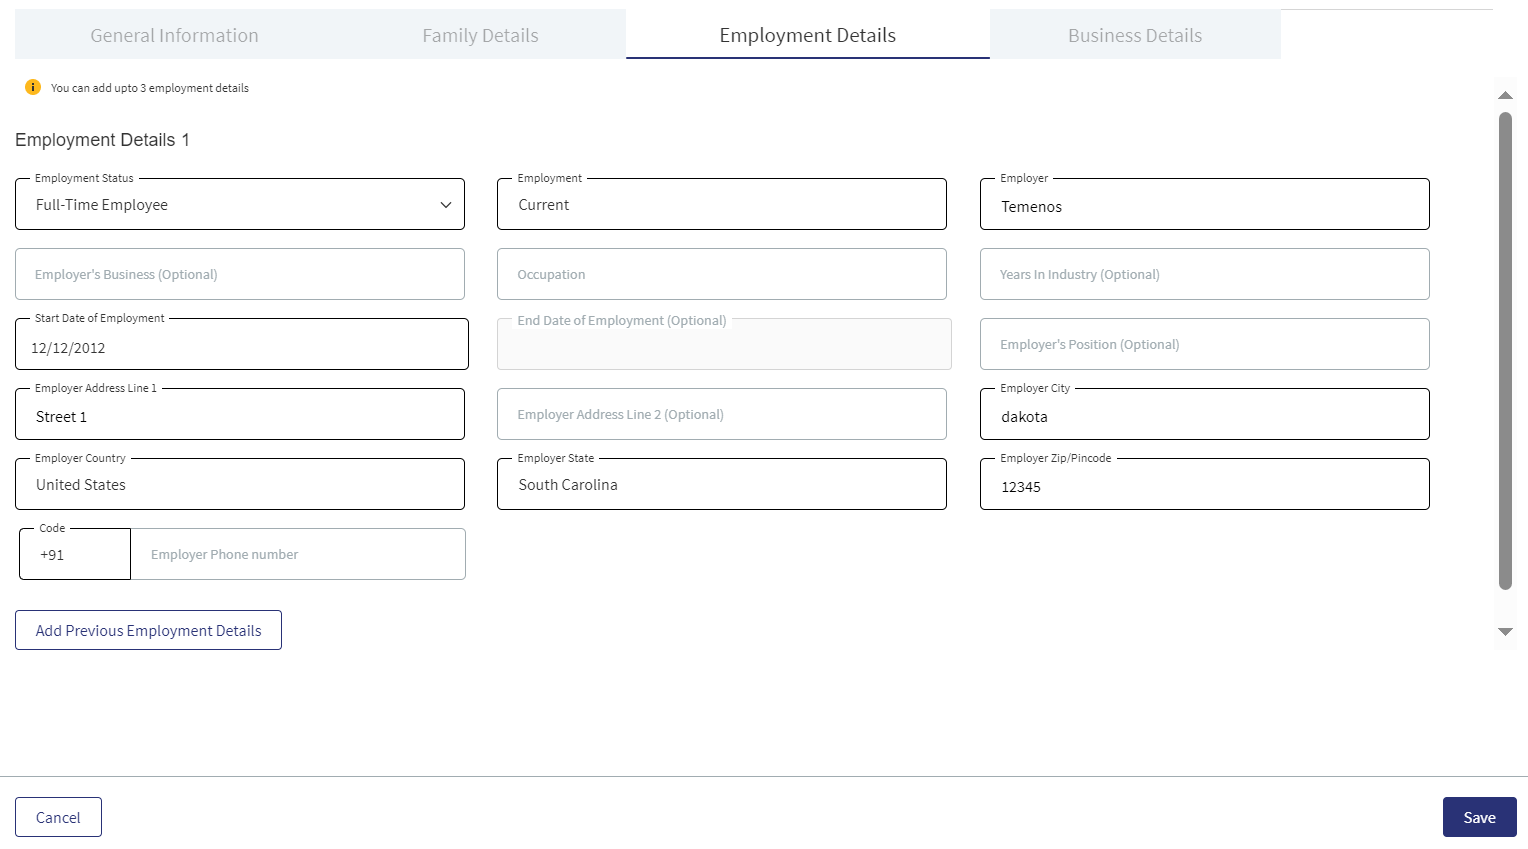
- Employment Details : The Employment Details section displays the following details - Employment (Current and Previous), Employer, Start Date, End Date.
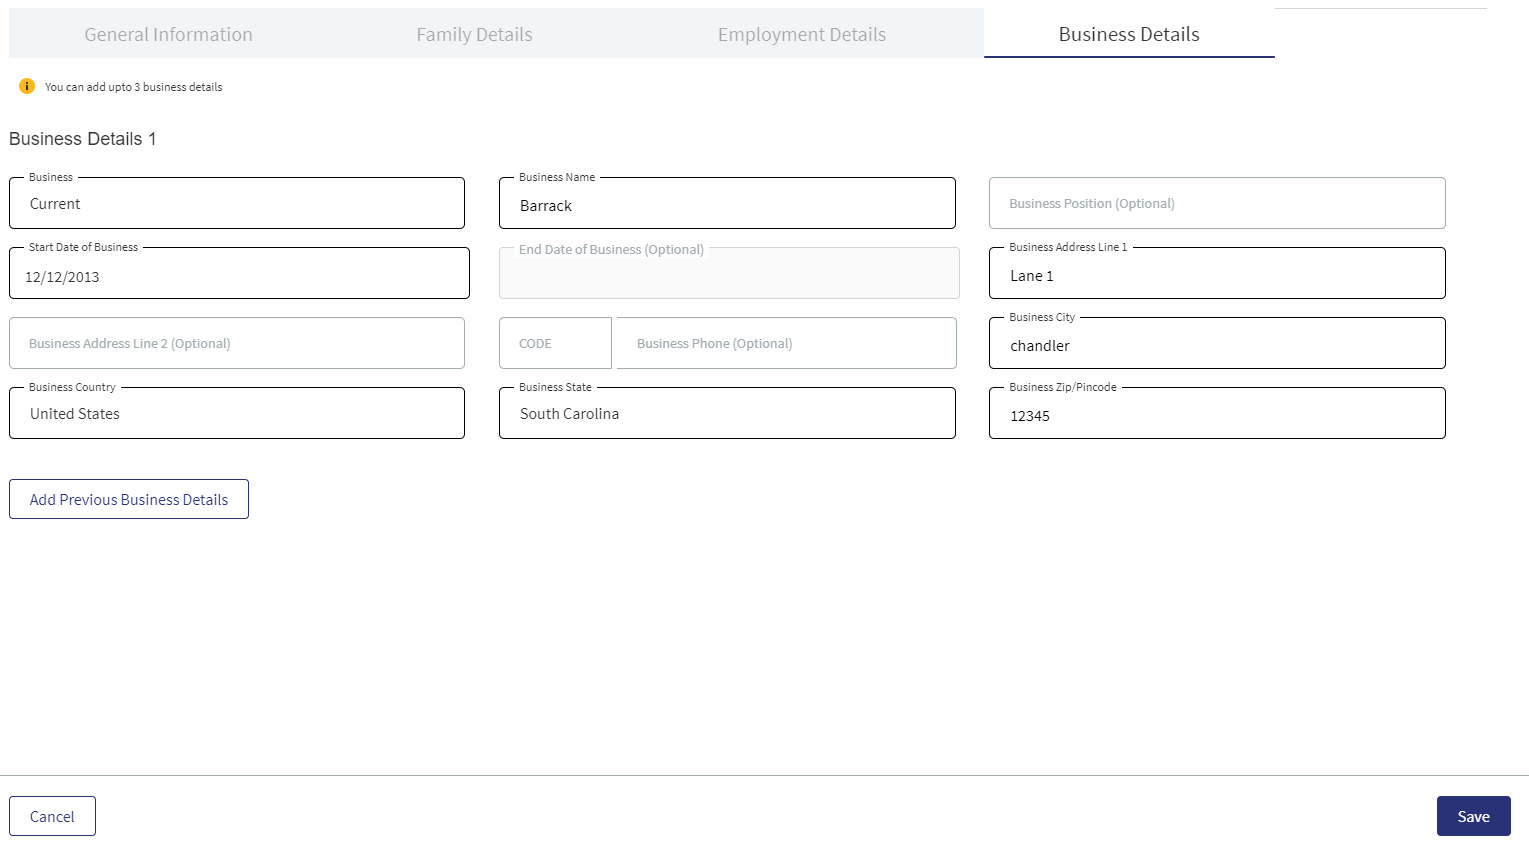
- Business Details(Self Employment): The Business Details section displays the following details - Business(Current and Previous), Business Name, Start Date, End Date.
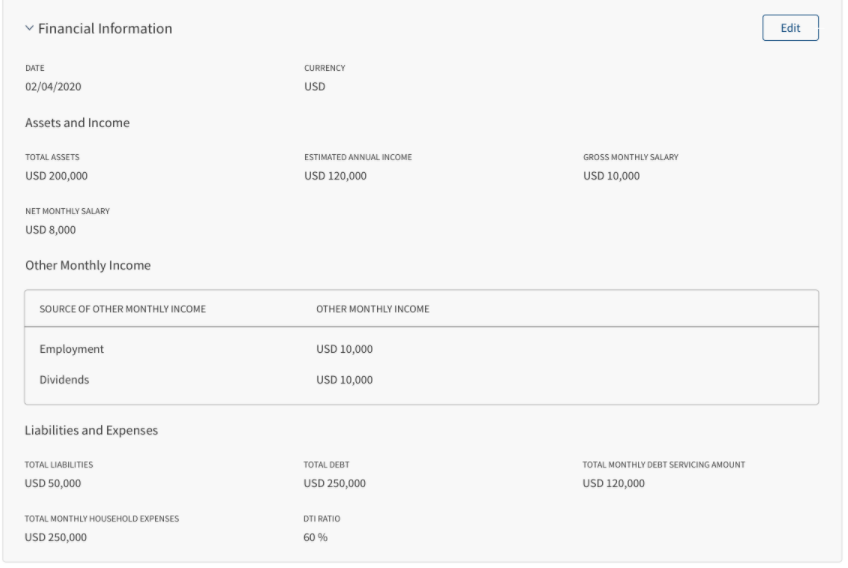
- Financial Information: The section is an accordion, in the collapsed state by default and expands only when the user wants to view the financial information.
- Date and Currency details
- Assets and Income: Total Assets, Total Net Annual Income, Gross Monthly Income, Net Monthly Income, and Other Monthly Income (Source of other Monthly Income and Other Monthly Income).
- Liabilities and Expenses: Total Liabilities, Total Debt, Total Monthly Debt Servicing Amount, and Total Monthly Household Expenses, DTI Ratio(Total Monthly Debt Servicing Amount + Total Monthly Household Expenses)/ Total Net Monthly Income) of each Party.
Edit Entity
Click the Edit button to modify the entity details.
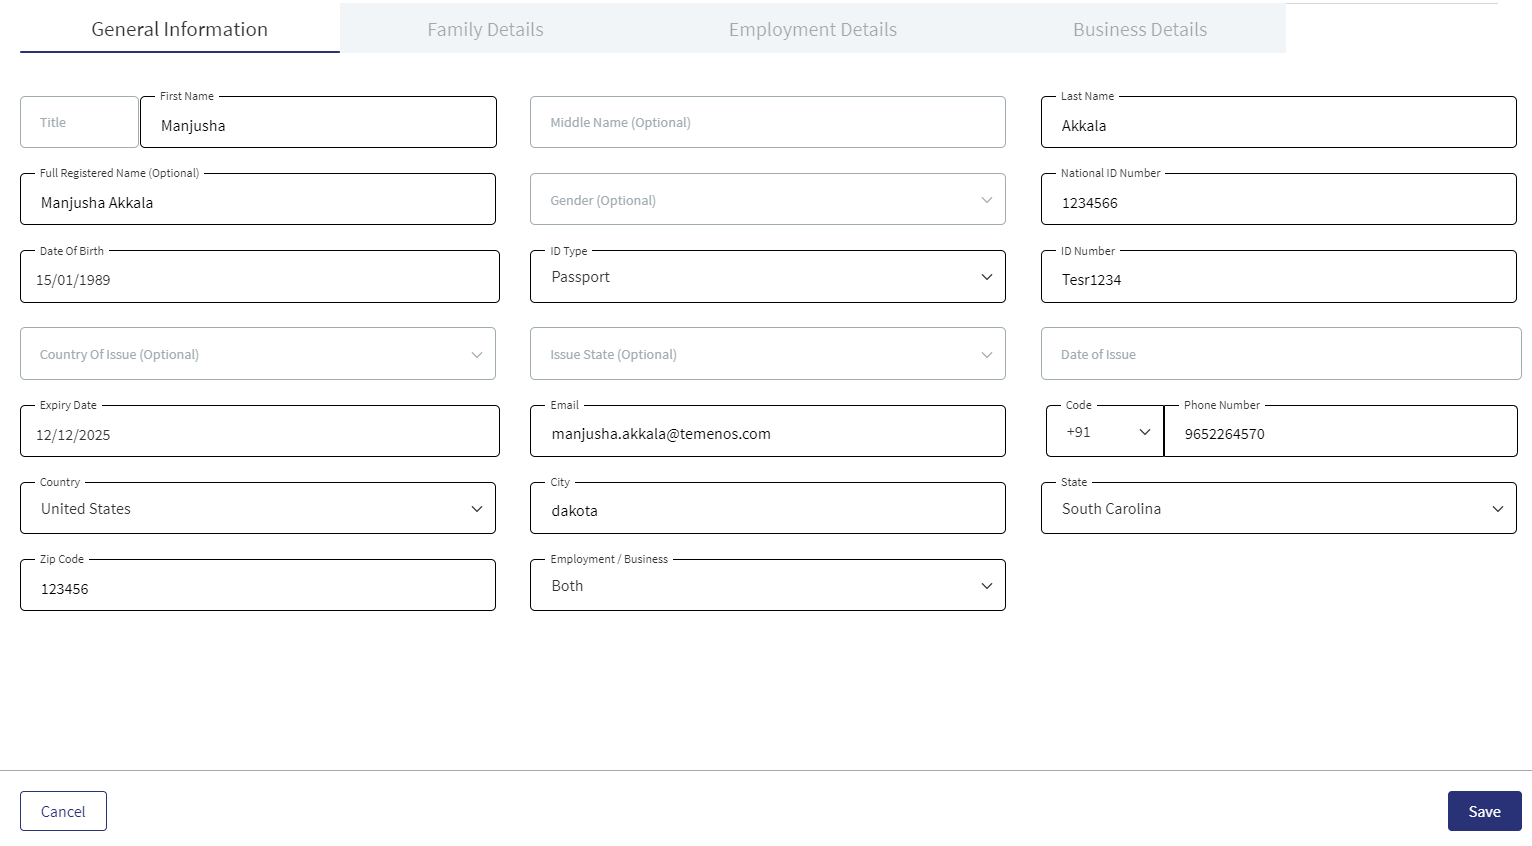
The application displays the following on the General Information tab:
- Entity ID, Entity Type, Status, First name, Middle name, and Last Name. These fields cannot be modified.
- By default, the MIS Code and Sector fields are assigned with Others option. If the value for these fields are not available from Party MS (ODMS in case of retail and SME), the fields are mapped to the value- others (code-9000) and the fields are editable.
Follow these steps:
- Click the Edit button to modify the entity details. Make the changes as required on the General Information, Individual Information, Employment Details, Business Details and Financial Information tabs.
- The following fields are mandatory and cannot be left blank: Full Registered Name, Date of Birth, Phone Number, National ID, and Country of issue.
- Click Update to save the details.
- The application displays a confirmation message that the record is updated successfully.
Employment Details : The Employment Details section displays the following details - Employment (Current and Previous), Employer, Start Date, End Date.
The following fields are editable in this section.
- Employment - Current/Previous- If current is selected, End Date is disabled.
- Employer
- Employment Start Date
- Employment End Date
- Employer’s Business (Optional Field)
- Employer’s Position (Optional Field)
- Address
- Employer Address Line1
- Employer Address Line2 (optional)
- Employer State
- Employer City
- Employer Country
- Employer ZIP/Pin code
- Employer Phone Number (Optional Field)
Business Details(Self Employment): The Business Details section displays the following details - Business(Current and Previous), Business Name, Start Date, End Date.
The following fields are editable in this section.
- Business- Current/Previous - If current is selected, End Date is disabled.
- Business Name
- Business Start Date
- Business End Date
- Business Name
- Business Type (Employer’s Business) (Optional Field)
- Business Position (Optional Field)
- Address
- Business Address Line1
- Business Address Line2
- Business State
- Business City
- Business Country
- Business ZIP/Pin code
- Business Phone Number (Optional Field)
Click Cancel to discard the changes. On the confirmation pop-up that appears, click Yes. The changes are not saved.
User Permissions:
| User | Add | Edit | View | Delete |
|---|---|---|---|---|
| RM User | Y | Y | Y | Y |
| Supervisor RM user | Y | Y | Y | Y |
| UW User/ Ops User | N | N | Y | N |
| Supervisor UW User/ Supervisor Ops User | N | N | Y | N |
| Admin User | Y | Y | Y | Y |
Business Entity Details

The application displays the following information:
- General Information: Entity ID, Entity Type (Business), Status, Legal Name of the entity, Registration ID of company, Company Type, Industry and Sub Industry, company Registration Date, Country of Incorporation, Years in Business, Website Address, Employee Count, Country, City, State, Phone Number, MIS Code, Sector, Risk Sector, and Language. Few information is picked from the back-end system, for instance, the bank branch and profit center are mapped with the relationship manager of the entity.
- Financial Information: Date, Currency, Financial Year.
Assests : Cash,Cash Equivalients and Deposits,Inventory, Accounts Receivables,Current Assests, Fixed Assests, Other Assests,Total Assets, Annual Revenue, Fixed Assests, Gross Profit, Total Expenses, and Profit After Tax (Net Earnings).
Liabilities : Current Liabilities, Account Payable, Short Term Debts, Long Term Debts, Total Share Holder Equities, Total Paid Up Capital, Total Liabilities, Share Holder's Equity.
Income Statement : Total Revenue, Cost of Goods, Gross Profit, Interest Paid, Depreciation, Other Expenses, Total Expenses, Net Profit After Tax.
- Estimates: Total Revenue, Net Profit After Tax.
This section is an accordion, in the collapsed state by default and expands only when the user wants to view the financial information.
Edit Entity
Click the Edit button to modify the entity details.
The application displays the following on the General Information tab:
- Entity ID, Entity Type, Status, Registration ID, and the Legal Name. These fields cannot be modified.
- By default, the MIS Code and Sector fields are assigned with Others option. If the value for these fields are not available from Party MS (ODMS in case of retail and SME), the fields are mapped to the value- others (code-9000) and the fields are editable.
Follow these steps:
- Click the Edit button to modify the entity details. Make the changes as required on the General Information and Financial Information tabs.
- The following fields are mandatory and cannot be left blank: Company Type, Registration Date, and Phone Number with area code. The Year and Currency are mandatory fields, all other fields are optional.
- Click Update to save the details.
- The application displays a confirmation message that the record is updated successfully.
- Click on History button to view the details for last 3 years of Assets, Liabilities, Income Statement (Month/Year).
Click Cancel to discard the changes. On the confirmation pop-up that appears, click Yes. The changes are not saved.
Group Entity Details

The application displays the following information:
- Entity ID, Entity Type (Group), Status, Group Name, Group Type, and Creation Date. Few information is picked from the back-end system, for instance, the bank Branch and Profit Center are mapped with the relationship manager of the entity.
Edit Entity
Click the Edit button to modify the entity details.
Follow these steps:
- Click the Edit button to modify the entity details. Make the changes as required.
- The following fields are mandatory and cannot be left blank: Company Type, Registration Date, and Phone Number with area code.
- Click Update to save the details.
- The application displays a confirmation message that the record is updated successfully.
Click Cancel to discard the changes. On the confirmation pop-up that appears, click Yes. The changes are not saved.
Contact card: Click the icon to view the relationship manager contact card - email, address, phone, and bank branch.

Addresses

The application displays the addresses of the entity and group with the following details: Address Type (Office denotes that it is a group), Address, City, State, and Postal Code. The address provided during onboarding is stored as Legal in address type. User can add other address types such as office, administration center, branch etc. for business. For individual, the address can be home, office, and other.
The address added by a customer in the Origination (Self Service) application under the company address is mapped as Primary address type.
Do any of the following:
- Click Add Address to add a new address. Not applicable if it is a group address.
- Use the context menu as required.
- Click Edit to modify the details. Not applicable if it is a group address.
- Click Delete to remove the record. In the confirmation pop-up that appears, click Yes. The record is removed. Not applicable if it is a group address.
- Click the row to view the details.
- Click Edit to modify the details. Not applicable if it is a group address
- Click X to close the form.
Not applicable if it is a group address.

- Fill the details.
- Click Add Address. The application displays a confirmation message that the address is added successfully.
- The address is added to the list.
Not applicable if it is a group address.
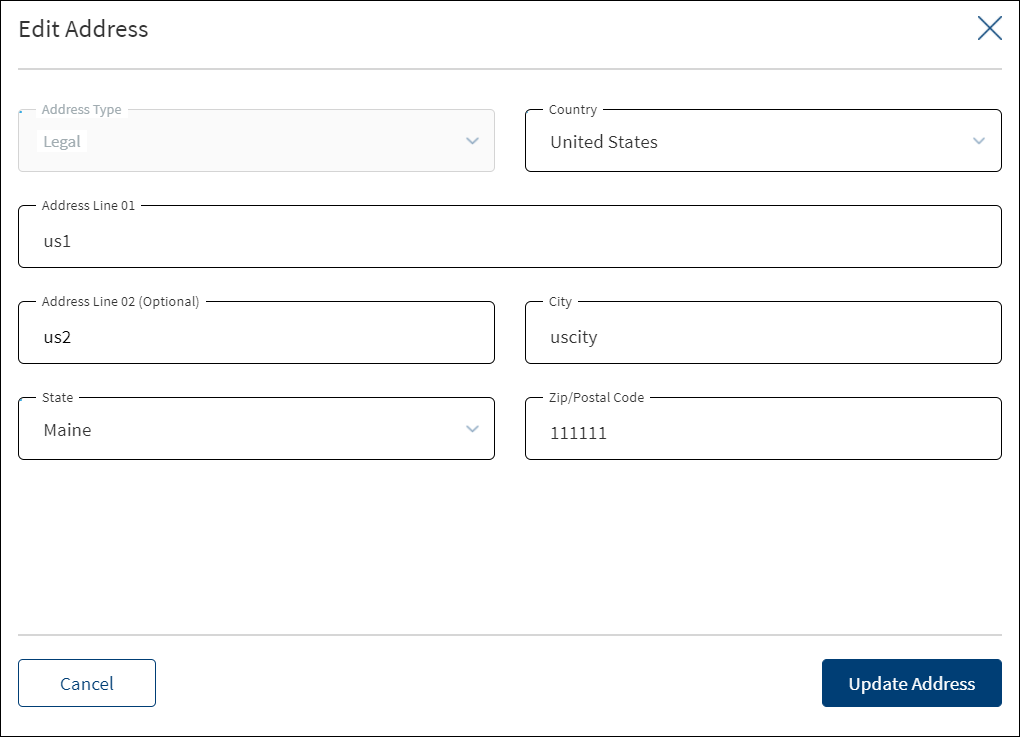
- Make the changes as required.
- The following details can be edited: Country, Address Line, City, State, and Zip/Postal Code.
- Click Update Address to save the details.
- The application displays a confirmation message that the address is updated successfully.
Click Cancel to discard the changes. On the confirmation pop-up that appears, click Yes. The changes are not saved.
Contacts

The application displays the list of contacts with the following details: Contact Type, Direct Phone number, Mobile Phone number, Email Address, and if the contact is a beneficial owner (if ownership is >=25%). Beneficial Owner section is applicable only for business contacts and not applicable to individual and group contacts. The contact that is added as part of onboarding process is shown as a primary contact by default. The contact added by a customer in the Origination (Self Service) application under the company address is shown as Primary contact.
Do any of the following:
- Click Add Contact to add a new contact.
- Use the context menu
 as required.
- Click Edit to modify the contact (individual, business, or group) details.
- Click Delete to remove the record. In the confirmation pop-up that appears, click Yes. The record is removed. The primary contact record created during onboarding cannot be deleted. The Delete option is not visible.
- Click the row to view the contact details.
- For Group and individual contacts, Beneficial Owner section is not applicable and the same will not be available in the summary also.
- Click Edit to modify the details or click X to close the form.
- Click the document name to view and download the document.
Use the feature to add individual, business, or group contacts. The fields in the form differs depending on the contact.

- Fill all the required details. Until otherwise stated, all fields are mandatory.
- Select the Contact Type from the list. The list items are fetched from the Address type field from Party MS for individual contact.
- Select the Job Title from the list. This field is not applicable for Individual contact.
- Enter the First Name and Last Name. These fields are not applicable for Individual contact.
- Enter the Middle Name. This field is optional. This field is not applicable for Individual contact.
- Select the Preferred Contact mode. The options are Direct Phone and Mobile Phone. By default, Direct Home option is selected. This field is not applicable for Individual contact.
- Select the area code and enter the Direct Phone number. If the preferred contact is mobile phone home, then this field is optional.
- Select the area code and enter the Mobile Phone number. If the preferred contact is direct phone home, then this field is optional.
-
Enter the Email Address.
At least one of the following optional fields field must be filled to save the contact details - Direct Phone, Mobile Phone, or Email Address.
- Select the Business Address from the list - Legal or Branch. This field is not applicable for Individual contact.
- In the Business Address list, the address of the group members is displayed. The user can select only from them. The address added here is displayed in the Address Summary with the type defaulted as "Office".
- In case of a Group, while adding a contact, the entire section of Beneficial owner (starting from Beneficial Owner field until the document upload section) is not applicable.
- Select if PEP and CP are to be enabled. By default, these are not enabled. This field is not applicable for Individual and group contacts.
- Enter the Ownership percentage. If the ownership is more than or equal to 25 percentage, the contact is treated as a beneficial owner and KYC information must be filled and supported documentation must be added under Beneficial Owner Information. This field is not applicable for Individual and group contacts.
- Upload a KYC supporting document.
- Enter the Document Name.
- Select the Document Type from the list.
- Select the Status from the list.
- Enter the Issuer name.
- Enter the Expiration Date in mm/dd/yyyy format.
- Select if it is a Visual document.
- Click Home Address and provide the address details. It is optional. This field is not applicable for Individual contact.
- Click Add Contact. The application displays a confirmation message that the contact is added successfully.
- Make the changes as required. The fields in the form differs depending on the contact - individual, business, and group.
- The Contact Type filed is read-only and cannot be edited.
- The Beneficial owner section is not applicable for individual and group contacts.
- Click Update Contact to save the details.
- The application displays a confirmation message that the contact is updated successfully.
Click Cancel to discard the changes. On the confirmation pop-up that appears, click Yes. The changes are not saved.
Narratives

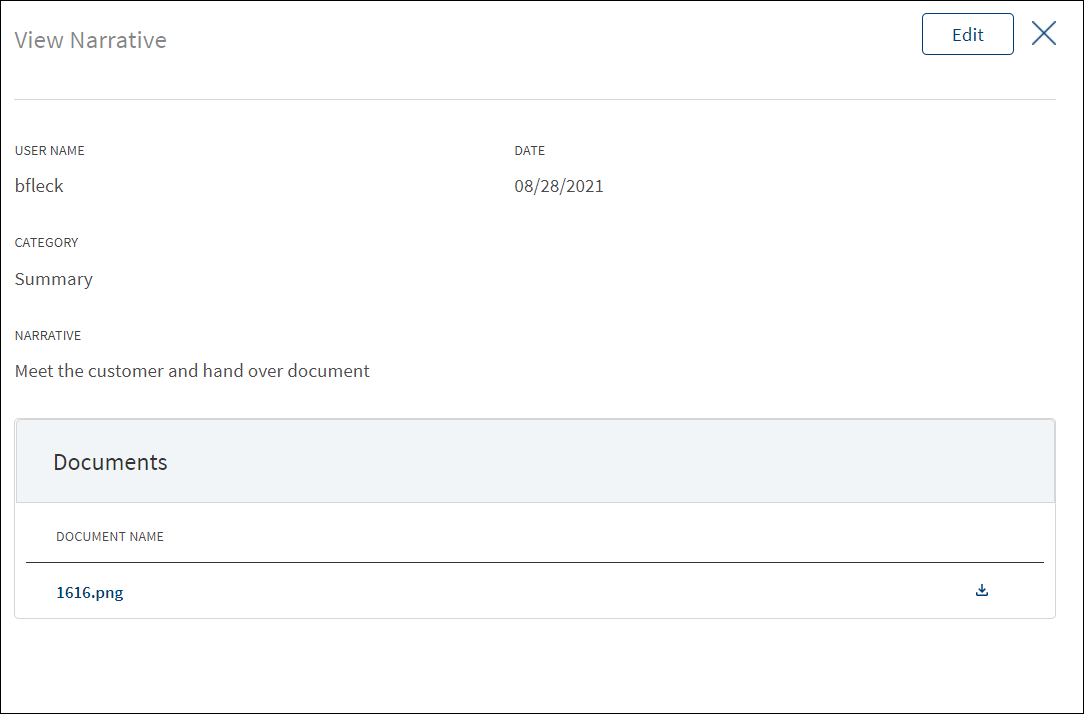
The application displays the list of narrative or comments entered with the following details: Category, Narratives, User name, Applies To, and Date of narration. The icon denotes that the narrative has document attachments. Click the icon to view the narrative details. The Narrative line item applied to an entity record is displayed in the summary and not in facility or request overview.
Do any of the following:
- Click Add Narrative to add a narrative.
- Use the context menu as required:
- Click Edit to modify the details.
- Click Delete to remove the record. In the confirmation pop-up that appears, click Yes. The record is removed. On deleting the narrative, the attached documents are also deleted.
- View details: Click any row to view the narrative details.
- Click Edit to modify the details or click X to close the form.
- Click the Document Name to view and download the document.
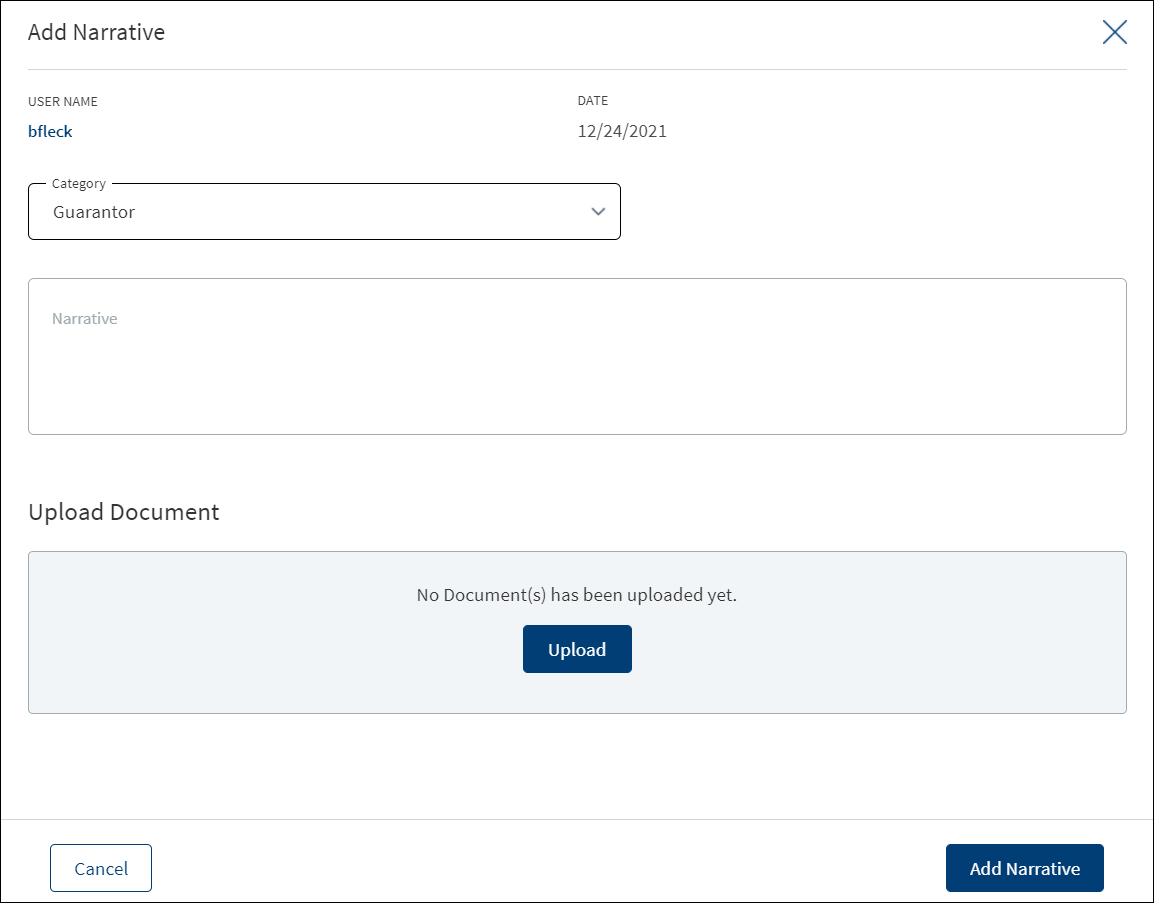
- Click Add Narrative to add a narrative.
- The application displays the signed-in user's user name and date of narration.
- Select the Category from the list (for example, Summary, Financial, Guarantor).
- Enter Narrative description. When a lengthy comment or description is entered which does not fit the field, then the content moves to the next line of the field. The field accepts up to 1000 characters.
- Click Upload Document to upload files to a narrative. A confirmation pop-up appears with maximum size and file name conditions. Click Okay to browse and upload the file. The uploaded document appears. This field is optional.
- Click the bin icon displayed beside each uploaded file to delete the file before adding a narrative.
- The document name can be alphanumeric and cannot contain spaces, and the maximum file size can be up to 25 MB.
- The following document types can be uploaded: jpeg, pdf, jpg, png, txt, doc.
- Click Add Narrative. The application displays a confirmation message that the narrative is added successfully. The narrative is added to the list. The narrative is displayed only on entity overview.

- Make the changes as required.
- A user who added the narrative can modify the following details. Other user can only view the details.
- Narrative text and Applies to in case of entity related narrative.
- Narrative text in case of facility related narrative.
- Click Download to download the existing files. If there are no existing files, click Upload to upload new files. On clicking Update, the uploaded files are successfully saved and updated in the summary screen. Upload the documents at once before updating the narrative.
- Click Update Narrative to save the details.
- The application displays a confirmation message that the narrative is updated successfully. The records that are updated at Facility Overview reflects at Request Overview and Entity Overview. Similarly, the records updated at Request Overview or Entity Overview reflects at Facility Overview.
Click Cancel to discard the changes. On the confirmation pop-up that appears, click Yes. The changes are not saved.
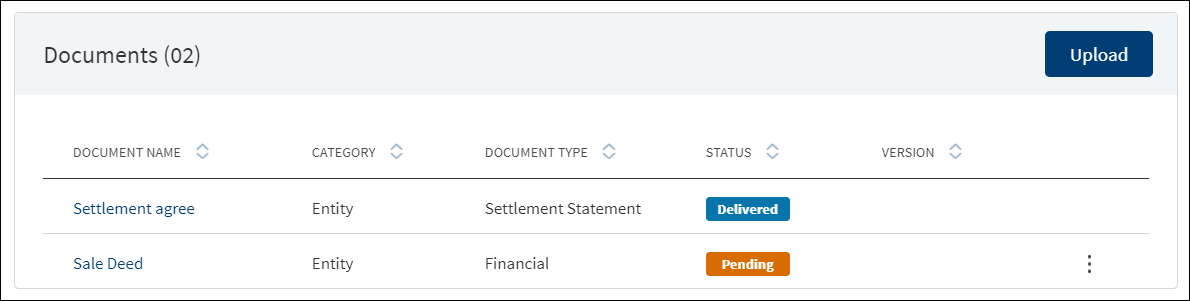
The application displays the list of documents associated with a request, entity, facility, or a collateral. All documents uploaded in front-end Origination as part of the overdraft or loan lending application

This section consists of two sub-sections:
- Uploaded Documents - Documents uploaded by Customer/bank user.
- System Generated Documents - The documents generated by system.
Uploaded Documents: This section displays the documents uploaded by the customer from the Origination app and by the Bank user. They are displayed by Document category group and this category has an accordion view, which on expanding displays the actual document along with the document type.

This section consists of the following fields:
- Document Category - Displays the document category - Proof Of Address, Proof of Incomes etc.
- Document Type - Displays the Document type that is uploaded - Passport, Driving license etc.
- Document Name - The File name of the submitted documents.
- Linked To - This is a new field where the bank user will find which facility the particular document is linked to. If the same document is “Linked To” more than 1 facility, all the facilities are listed by comma separation and if more documents are linked, it displays the number of facilities and by clicking on it we see the list of facilities. Based on the “Linked To” field, the documents are displayed in the respective Facility overview.
- Status - Displays the status of the document in different color depending on the status - Approved, Pending, Signed, Delivered, Reviewed or Rejected. All documents uploaded in the Origination app will be in Pending status.
Upload : To upload a new document.
System Generated Documents :This section displays the documents generated by the system in Temenos Digital Assist. They are displayed by Document category group and this category has an accordion view, which on expanding displays the actual document along with the document type.

This section consists of the following fields:
- Document Type - Documents submitted before submission in the Origination app have the type as stored in Document MS. (They contain the information about type of document which has been uploaded during the origination).
- Document Name - The documents submitted before submission in the Origination app have the name File Information as given by the customer. If there is no File Information added, then the document name is added as file name.
- Document Category - Displays the document category.
- Linked To - This is a new field where the bank user will find which facility the particular document is linked to. If the same document is “Linked To” more than 1 facility, all the facilities are listed by comma separation and if more documents are linked, it displays the number of facilities and by clicking on it we see the list of facilities. Based on the “Linked To” field, the documents are displayed in the respective Facility overview.
- Status - Displays the status of the document in different color depending on the status - Approved, Pending, Signed, Delivered, Reviewed or Rejected. All documents uploaded in the Origination app will be in Pending status.
Mapping between the Origination document type with Temenos Digital Assist document type.
| Document Type in Temenos Digital Origination | Document Type in Temenos Digital Assist |
|---|---|
| Entity Certification/Registration | EntityCertification |
| Tax ID Number Certification | TaxIdCertification |
| Articles of Incorporation | Article of Incorporation |
| Partnership Agreement / Declaration | PartnershipAgreement |
| Trust Agreement / Declaration | TrustAgreement |
| Article of Incorporation | ArticlesIncorporation |
| Financial Statement | FinancialStatements |
| Passport | Passport |
| Driving License | DriverLicense |
| National ID | TaxIdCertification |
Perform any of the following:
- Download Document: Click the Document Name to view and download the document if required. To download, click Download on the screen the appears.
- View Details: Click the row to view the document details. Click the ID to view the overview details. The document can be mapped to a request, entity, facility, or a collateral.
- If the document category is applied to a collateral record, then the document is displayed in the document summary under the respective facilities where the collateral is used.
- If the document category is applied to entity record, then the document is displayed in the document summary under respective entity overview only and will not be available under request overview and facility overview.
- Click Upload to upload a new document.
- You will be able to view all the modification facilities listed along with the new facilities in facilities section with the following Facility ID, Facility type, Amount, term, Decision Status
- If both the Purpose options are selected initially, both New and Modification facilities are listed on this screen. Otherwise, only one of the Facility displays based on the selected purpose.
- Use the context menu as required. The context menu is displayed only for the documents with Pending status:
- Click Edit to modify the details. The document with Pending/Signed status only can be edited.
- Click Delete to remove the record. The document with Pending status only can be deleted. In the confirmation pop-up that appears, click Yes. The record is removed.
- On the Documents list screen, click Upload.
- A confirmation pop-up appears that the maximum file size can be up to 25 MB and the file name can be alphanumeric without any spaces. Click Yes.
- A window to upload the document is displayed.
- Select the file to upload. The file name can contain alphanumeric characters and cannot contain spaces. The document types can be PDF, TXT, JPG, PNG, and JPEG. The maximum size allowed per document is 25 MB. The application displays a error message if incorrect document type is selected. In this case, click Add New Document to continue with the document upload.
- The Add Document screen is displayed. All fields are mandatory.
- Enter the Document Name.
- Select the Document Type.
- Select the Category from the list. The document is attached to the selected category level.
- The application displays the list depending on the selected document category. Select the category to apply to the document. The selection can be one, many, or all.
- If category is request, then the Request ID is displayed by default.
- If category is facility, this field lists all the facilities under the request. Defaults if this list has one value.
- If category is entity, this field lists all the entities related to the request. Defaults if this list has one value.
- If category is collateral, this lists all the collateral related to the request. Defaults if this list has one value.
- Select the Status from the list - Approved, Pending, Signed, Delivered, and Reviewed.
- The Applies to field is by default the Entity Name for Entity Type of Documents and Collateral for Collateral type of Documents. The mapping between Document Type and Applies To is done in DMN.
- The Linked To field , all the active facility of the Entity is listed. User can select multiple facilities. This is an optional field when uploaded from Entity Overview. The Documents uploaded through “Origination App”, this field is by default the Facility.
- If an entity related document is uploaded from the Origination page, it displays in Entity Overview, Request Overview, Facility Overview for the linked facility.
- If a facility related document is uploaded from the Origination page, it displays in Request Overview, Facility Overview of linked facility.
- If a collateral related document is uploaded , it displays Entity Overview of the Collateral owner, Request Overview, Facility Overview of the linked facilities.
- Click Upload Document. The application displays a confirmation message that the document is uploaded successfully. The document is added to the documents list. If the document category is applied to entity record, then the document is displayed in the document summary under respective entity overview only.
- An Adhoc document can be uploaded from any Overview(Entity, Request, Facility).
The document with Pending and Signed status only can be edited, however we do not have documents with Signed status in Entity Overview.

- Only the document Status, Linked To can be edited.
- Select the Status from the list - Approved, Pending, Signed, Delivered, or Reviewed.
- The status : Pending and Signed are editable.
- The user can add/remove the interaction by editing the Link To.
- Click Update Document to save the details.
- The application displays a confirmation message that the document details are updated successfully.
- If the Link To is Edited and if the Facility is removed then that document will not be visible in Facility Overview and Request Overview, however it will be visible in the Entity Overview.
- The Edit option for the logged in user depends on the permissions of the role.
Click Cancel to discard the changes. On the confirmation pop-up that appears, click Yes. The changes are not saved.
The documents uploaded by the Customer / bank user or generated by the system, bank user in the Document Section can be viewed by clicking the View Document option. The uploaded Adhoc Documents can also be viewed in this section.

The Document Category with an accordion view displays : Document Type, Document Name, Applies to, Status.
When clicked on the documents in the row the following fields display:
- Document Category
- Document Type
- Actual Document
- Document Name
- Applies To
- Linked To
The view option for the logged in user depends on the permissions of the role. A Bank user will be able to View documents uploaded through Customer Action in the “Uploaded Document” section in Entity Overview, Request Overview and Facility Overview based on the Document Category and Type.
The Bank user will be able to delete the uploaded /system generated documents. The Delete option is enabled only for the documents with status pending. Once the document is deleted based on the Link To, all the documents are delinked and deleted. The Delete option for the logged in user depends on the permissions of the role.
Parties

The application displays the Connected Entities for the selected entity and the Organizational Structure of the selected entity.
Connected Entities

The application displays the list of related companies/parties added during loan application with the following details:
- Party Name: Click to view the entity details.
- Rating: The rating is fetched from the respective entity overview section.
- Contact person: Click to view the contact details.
- Phone Number: Primary contact phone number.
Do any of the following:
- Click the row to view the party details.
- Click the Party Name link to view the entity details.
- Contact person. Click to view the contact details.
- Click Add Party to add a related party to the entity.
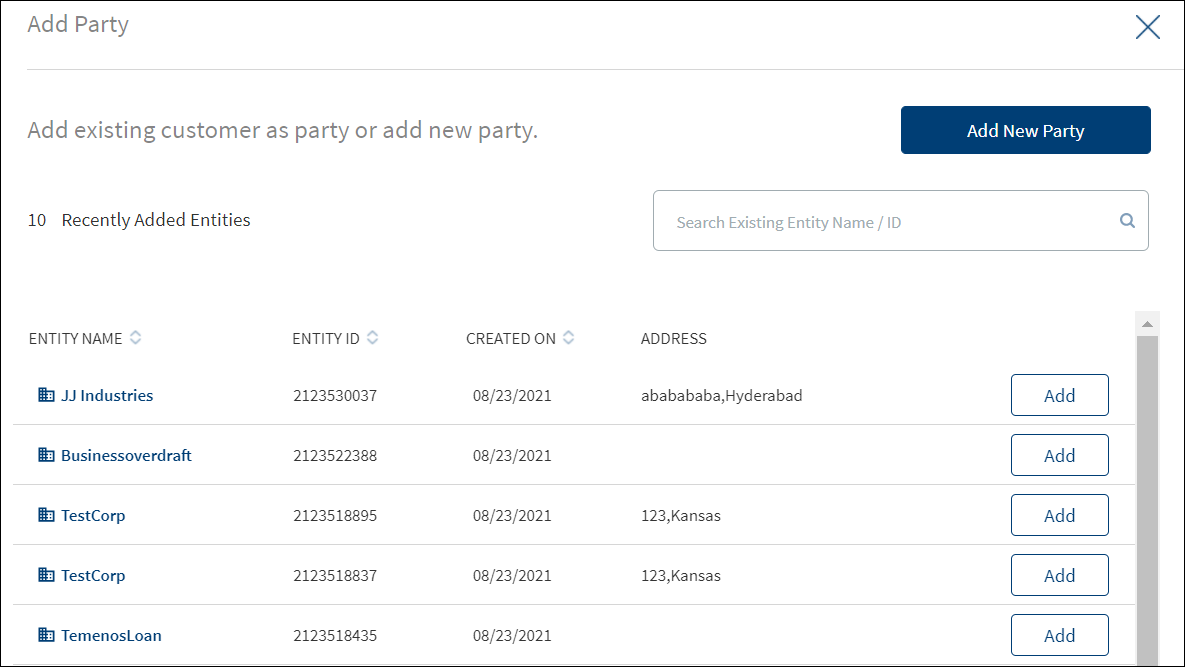
- Select the required party. Use the search option to look for a specific party. Alternatively, click Add New Party to add a new business or an individual party.
- Click Add. The party is added to the connected entities list.
- On the context menu, click Delete to unlink the party. On the confirmation pop-up that appears, click Yes. The party is unlinked.
- User cannot delete or unlink a related party that is already used by a Request or Facility and an alert is displayed. For example, If ABC Entity is related to XYZ Entity and with this relation there is an active request, then the user cannot unlink.
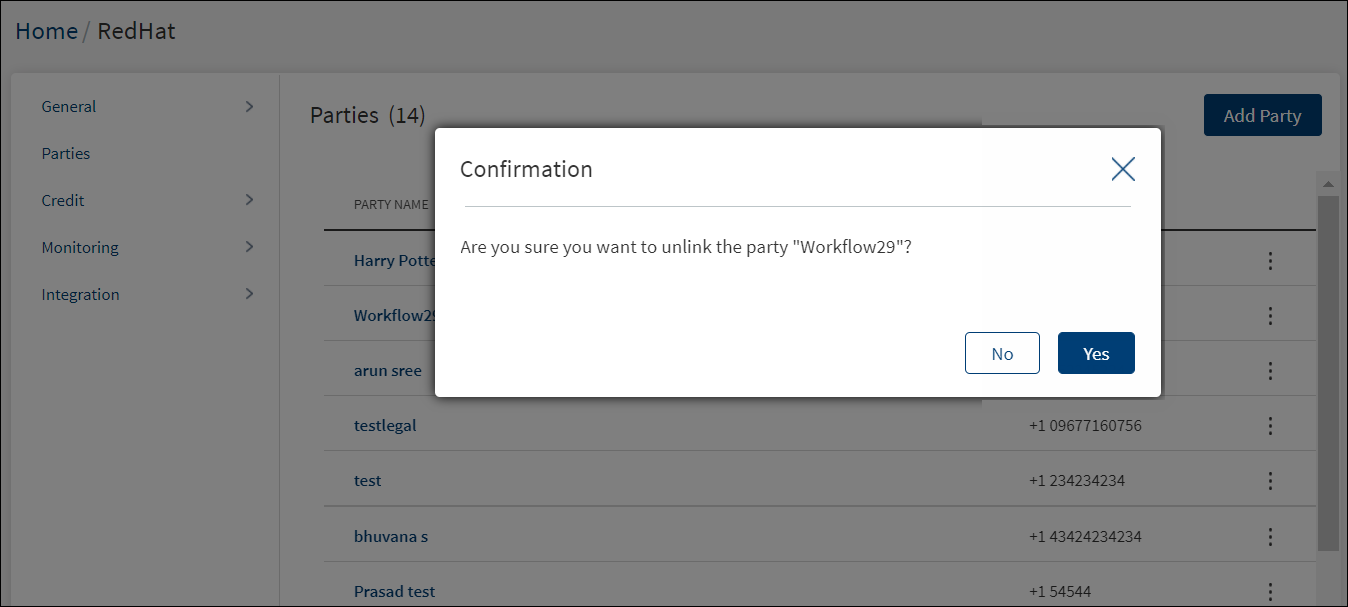
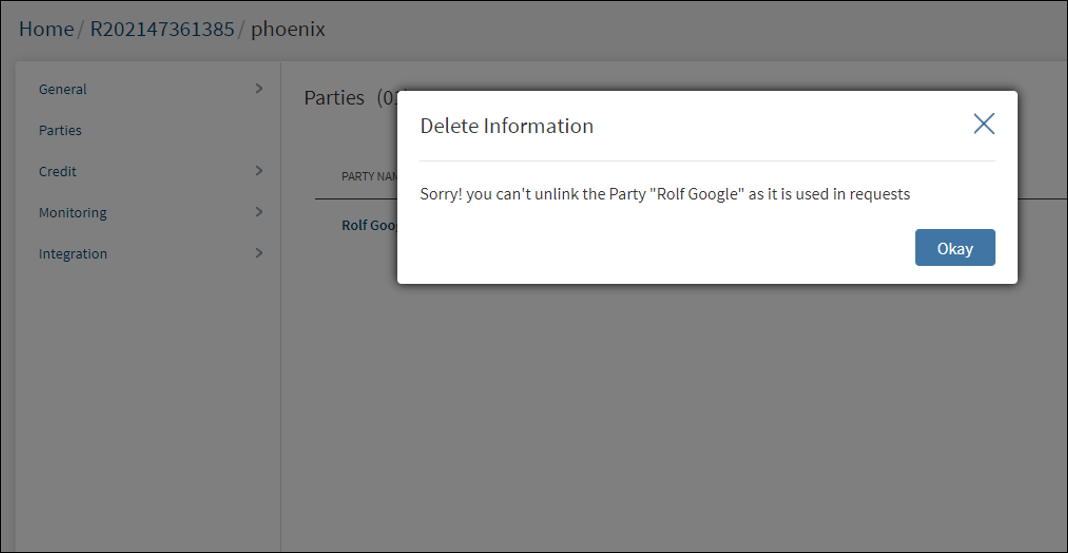
- User cannot delete or unlink a related party that is already used by a Request or Facility and an alert is displayed. For example, If ABC Entity is related to XYZ Entity and with this relation there is an active request, then the user cannot unlink.
To Add a Party in Business Entity EO
Bank user must be able to add the entities that are shown in the parties tab as and when required for appraisal.
User has to fill in the following details in Link Information section:
For Business:
- Parent Company: This field is not editable and the entity name under purview
- Relationship (Mandatory): Sister Concern, Subsidiary (List Field with these values)
- Ownership (Optional): Percentage Field
- Beneficial Ownership: Select Yes or No will be filled based on input provided in the Ownership.
- Ownership>= 25% Yes
- Ownership <= 25% No
- If not filled, No selection
For Individuals:
- Parent Company: This field is not editable and the field filled the entity name under purview.
- Relationship (Mandatory): Sister Concern, Subsidiary (List Field with these values)
- Ownership (Optional): Percentage Field
- Beneficial Ownership: Yes or No will be filled based on input provided in the Ownership
- Ownership>= 25% Yes
- Ownership <= 25% No
- If not filled, then No selection
Politically Exposed Person: Yes or No selection
Bank user must be able to update the entities that are shown in the parties tab as and when required for appraisal.
Edit Entity Functionality is applicable for SME.
To edit the Party, click Edit button, in addition to the current field, a new section displays called Link Information with values as Parent Company, Relationship, Ownership, Beneficial Owner, Politically Exposed Person.
For Business:
- Relationship (Mandatory): Sister Concern, Subsidiary (List Field with these values)
- Ownership (Optional): Percentage Field
- Beneficial Ownership: Yes or No will be filled based on the input provided in the Ownership
- Ownership>= 25% Yes
- Ownership <= 25% No
- If not filled, No selection
For Individuals:
- Relationship (Mandatory): Sister Concern, Subsidiary (List Field with these values)
- Ownership (Optional): Percentage Field
- Beneficial Ownership: Yes or No will be filled based on input provided in the Ownership
- Ownership>= 25% Yes
- Ownership <= 25% No
- If not filled- No selection
- Politically Exposed Person: Yes or No selection
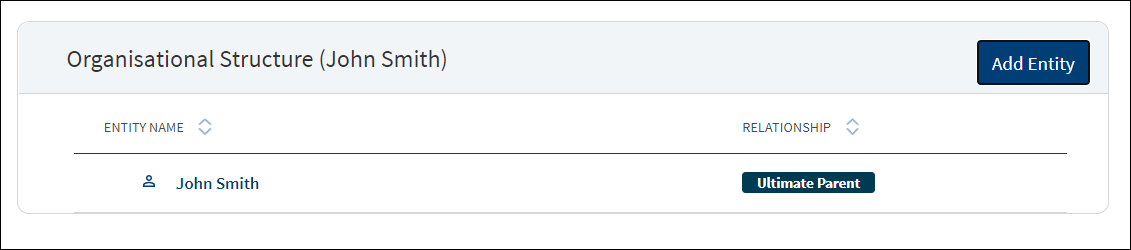
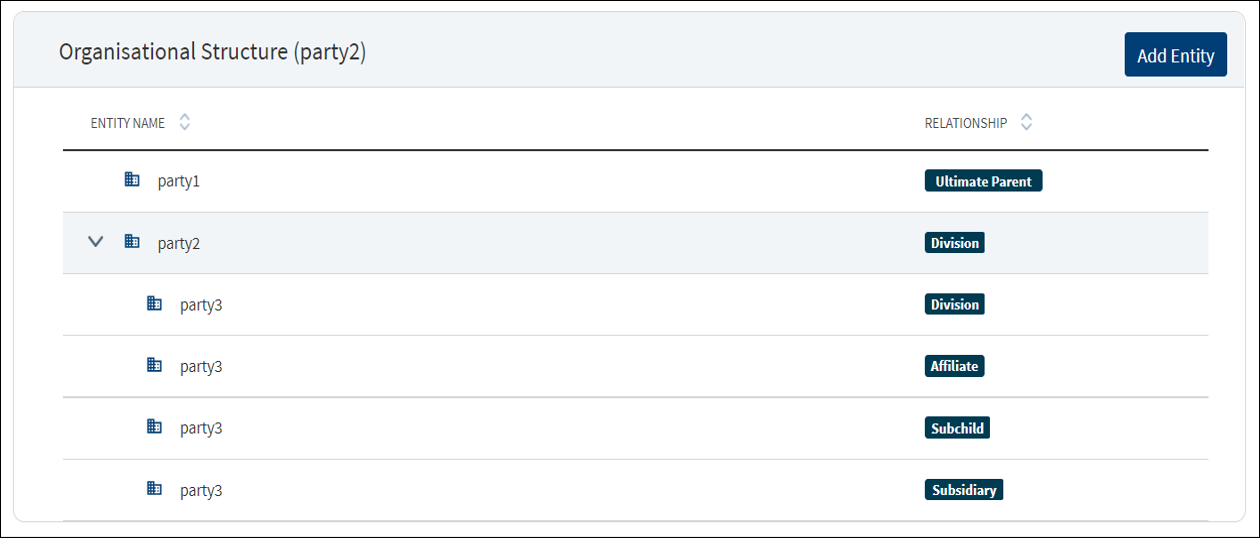
Organizational Structure
This section indicates the organizational structure of the entity along with the relation the entity has with the parent entity.
The related Company displays under Organization Structure with the relationship as sister concern or Subsidiary as selected by the user in the Origination app.
The related company added in the Origination App is added as Party to Party relation in Party MS and not as Party to the Application.
Added related companies will have same post submission flow in assist as that of the related company.
Parties Enhancements
Bank User must be able to view the relevant information with regards to Parties associated with the entity.
This section shows the parties that are associated with the entity through any relation
Connected Entities: This tab displays the relationship between entities
For Business Entities: Connected Entities involves the related companies, Related parties, and their relation such as director, Partner, Sister concern etc which are provided by the customer in the Origination Application.
Columns displayed : Entity, Relationship
User can Edit & Add functions are allowed and. Delete Permission is disabled for all users
For Individuals Entities: Connected entities involves the entities that are in any relation with the individual.
Columns displayed : Entity
User cannot Edit and Delete information. User can view and Add permissions is allowed.
Organization Structure: This tab displays the Organizational structure of all the business entities only and not Individuals.
For Business: (Existing functionality will follow)
This panel displays the relation between the company and its subsidiaries if any which are provided by the customer in the Origination App.
This section is not applicable for Individuals.
The related parties & companies added in the origination app:
- The Role which they select should be what goes into Party to Application relation in Party MS.
- The Relationship which they select should go in Party to Party relationship in Party MS.
The application displays the organization structure list with the following details:
- Entity Name: All the entities of the organization are displayed. Click to view the entity overview details.
- Relationship: The relation the entity has with the parent such as Parent, Division, Subsidiary, and Affiliate.
- Ultimate Parent: This field denotes the ultimate parent of the entire organization. There can be only one ultimate parent for the entire organization.
- Parent: The parent of the entity is displayed. In case of ultimate parent, this field will be blank.
- The relation and their hierarchy are defined in the master data table.
- The sample relation and their hierarchies - Ultimate Parent > Division > Subsidiary > Affiliate.
- The organizational structure is only for representation and it is not used for any other exposure calculation in any request or facilities.
- For the current entity, if there is already an organization structure that has been created, the structure appears in the current entity’s organization view.
- The accordion view is closed by default. User can use the accordion only to drill down further.
Credit
This section explains the following:
Financial Ratio Results

The application displays the financial ratio results with date added and period. The system accepts ratios up to two decimals.
Do any of the following:
- Click Add Results to add a new financial ratio result.
- Click Compare Results to compare results between the parties that were added at the entity level.
- Use the context menu as required.
- Click Edit to modify the details.
- Click Delete to remove the record. In the confirmation pop-up that appears, click Yes. The record is removed from Entity Overview, Request Overview, and Financial Overview screens.
- Click the row to view the details.
- Click Edit to modify the details or click X to close the form.
- Click Add Results on Entity Overview screen to add the financial ratio.
- In Add Results page, select Year and Month.
Except Year and Month, the remaining fields are optional.
- Upon selection, the remaining fields are displayed. Add values for Liquidity, Leverage, Profitability, and Efficiency.
- Click Add Results to save the details.
- If no values are provided, the field values are displayed as hyphen.
- Make the changes as required.
- All the fields are editable except the year and month.
- Click Update Results to save the details. The updated details are displayed in Financial Ratio Results section of Entity Overview, Request Overview, and Facility Overview screens.
Click Cancel to discard the changes. On the confirmation pop-up that appears, click Yes. The changes are not saved.
Compare various financial ratios of an entity to get an understanding as to how the entity has performed over the timeline.
- Click Compare Results under Financial Ratio Results section. The comparison of financial ratios of the latest results are displayed. The compare button comes up only when there are multiple records; if a single record is available, compare is not shown.
- If there are only three records, system displays the comparison of the three records.
- If there are more than five records, system picks the latest five records and displays the comparison.
The fields on the compare screen are not editable.
Monitoring
This section covers the items that are being tracked.

Covenants

The application displays the list of covenants or the tracking conditions for the entity with the following details: Covenant Type, Covenant Name, Requirement, Facilities associated with the covenant, and Status. All active covenants are required to be tracked.
Do any of the following:
- Click the row to view the details.
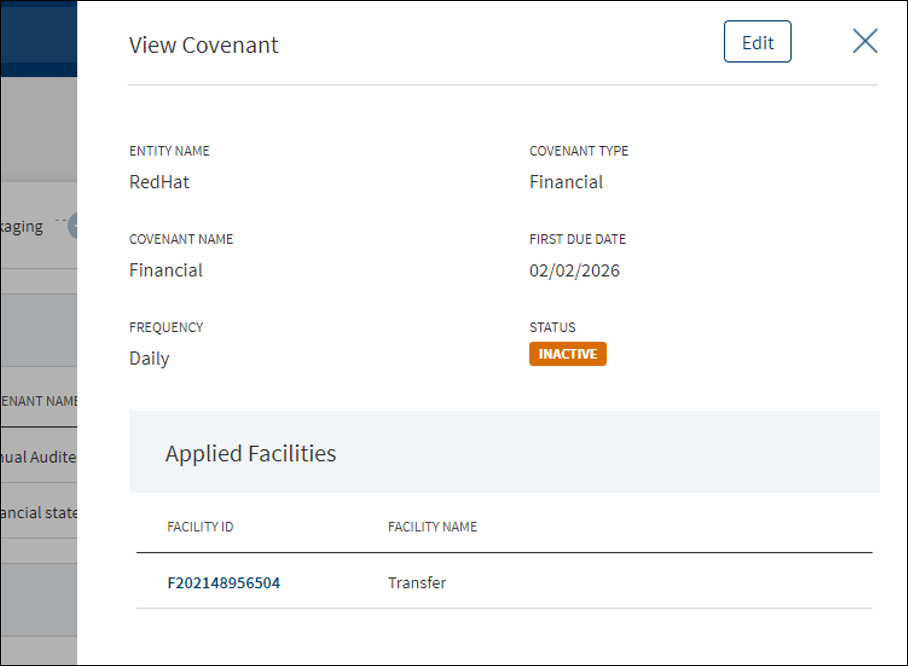
- Click the Product ID to view the product overview details.
Risk Ratings

The application displays the risk rating summary of all facilities associated with the entity with the following details: Rating Type and Current Value details. The Adjustment Rating is displayed if available, otherwise New Rating is displayed.
Do any one of the following:
- Click the row to view the details and edit the risk rating details if required.
- Click Add Rating to add a new rating.
- On the context menu click Edit to modify the risk rating details:
- Select the Rating Type from the list. For example - Internal.
- The application displays the previous rating with date if the rating type was rated earlier. Otherwise, Previous Rating is displayed as N/A.
- Select the New Rating from the list.
- Select the Adjustment Rating from the list. It is an optional field.
- Enter a valid rating Date in mm/dd/yyyy format. The date must be unique. If a rating had been provided on the same date previously, the application prompts that a record with same date already exists.
- Enter a valid Next Credit Review Date in mm/dd/yyyy format. It is an optional field. The date must be greater than the rating date entered in the previous field.
- Enter the Extension Period in Months and Days in the respective boxes. It is an optional field. The value must be in numbers.
- Enter Comment if required. It is optional. When a lengthy comment or description is entered which does not fit the field, then the content moves to the next line of the field. The field accepts up to 500 characters.
- Enter View History to view the historical ratings with Rating Type, Date, and Rating details.
- Click Add Rating. The application displays a confirmation message that the rating is added successfully.
Click Cancel to discard the changes. On the confirmation pop-up that appears, click Yes. The changes are not saved.
The Score Card section is currently applicable only for SME.
This section gives the overview of the risk rating details. It has two sections: Risk Rating and Score Card.
Risk Rating displays the below fields:
- Name
- Rating Type
- Previous Rating
- New Rating
- Adjustment Rating
- Date
- Comment
- History - View History (clickable)
Score Card: This section displays the Total Score eligibility for the Entity. The value ranges from 0 TO 100.
It displays the below fields:
- Application Information
- Value
- Score
Do any one of the following:
- Click View History to view the historical ratings.
- Click X to close the form.
- Make the changes as required.
- The following details can be edited: New Rating, Adjustment Rating, Next Credit Review Date, Extension Period in Months and Days, and Comments.
- Click Edit Rating to save the details.
- The application displays a confirmation message that the rating is updated successfully.
Click Cancel to discard the changes. On the confirmation pop-up that appears, click Yes. The changes are not saved.
Integration
The section explains the integration related details.

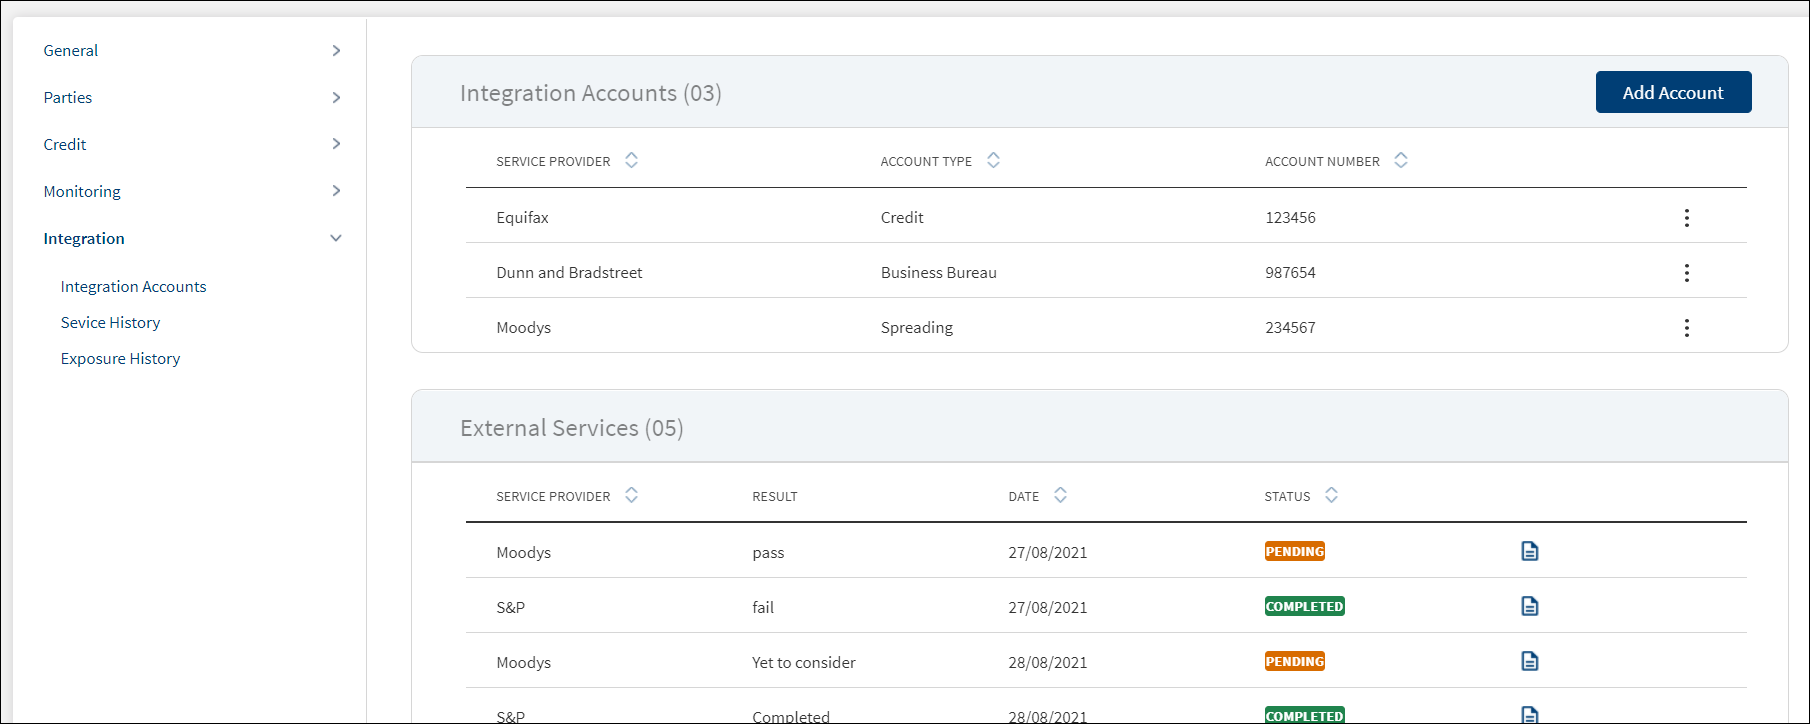
Integration Accounts
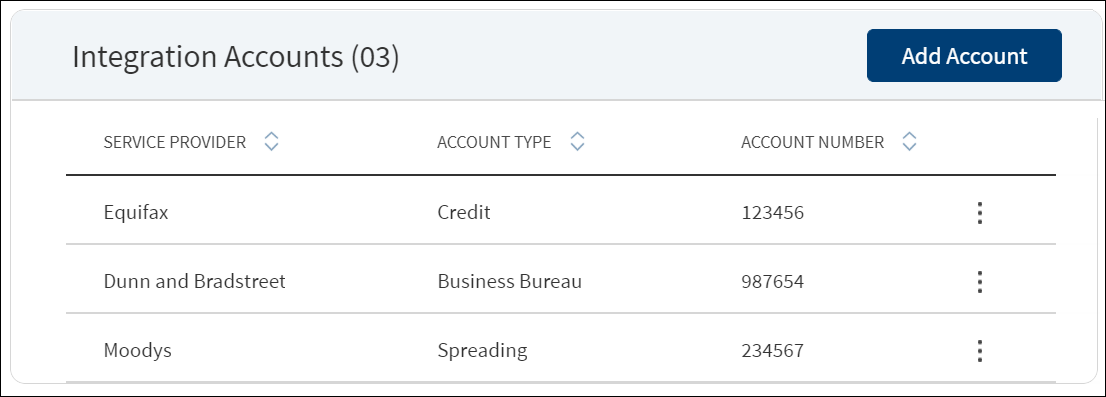
The application displays the list of third-party service providers being integrated for which type of rating or integration - for example, credit bureau. For a corporate customer, it can be credit bureau and for a personal customer, it can be consumer bureau. Spreading is margin calculation, business bureau is for getting a credit report, and so on. The following information is displayed: Service provider, Account Type and the service Account Number. This feature is not applicable for Retail lending and SME lending requests and not visible to the bank user roles managing these requests.
Service History

The application displays the service history of the service providers added previously. This is associated with a task and when the report is generated, the task is completed. The application displays the following details: Service Provider name, Entity Name, Account Type, Date report received, Status, and provision to download the report.
Click any row to view the details.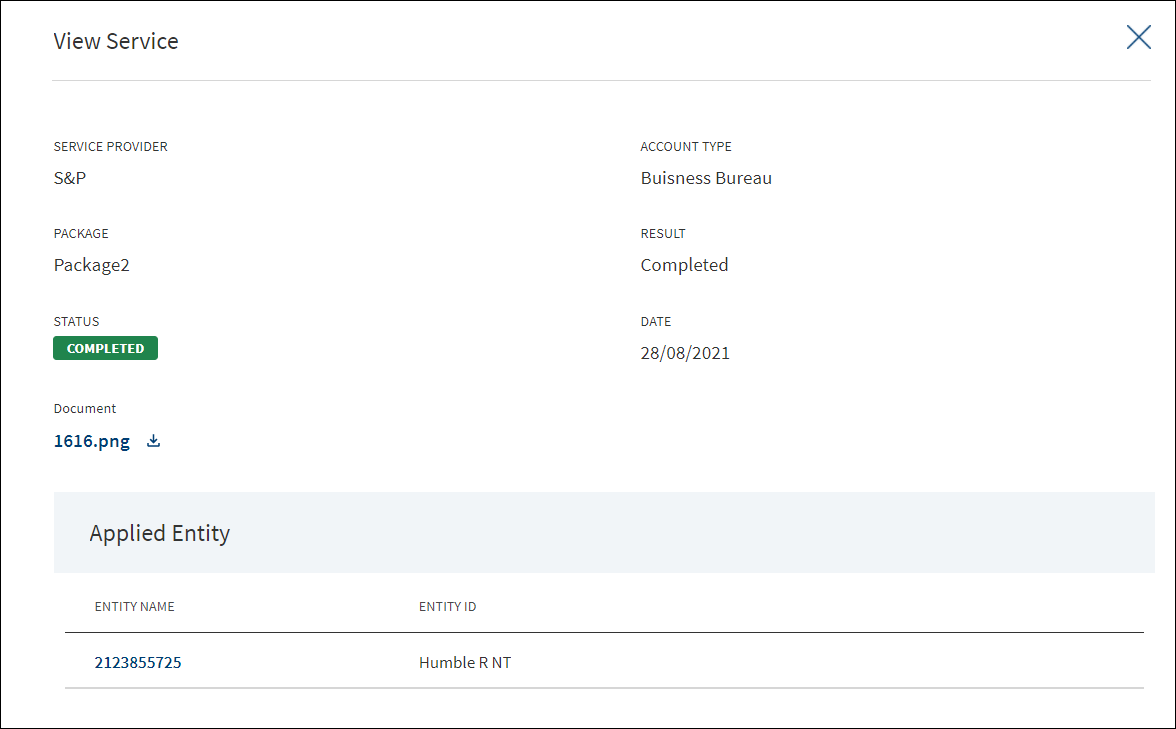
APIs
For the complete list of APIs shipped as part of this feature, see Experience APIs documentation.
In this topic